
It can be hard to entertain a house full of kids on Thanksgiving Day. These 10 crafts are very simple to make, and the kids will have so much fun creating them. You will also have things to decorate the house with when they are finished making them so that is an added bonus.
Don’t worry, you won’t have to decorate your house with another boring old turkey made out of a hand print. These crafts are all unique and some of these crafts are even edible which is always a bonus. We guarantee that your family will have fun making the crafts on this list. Enjoy the time you have with the people you love and make memories that will last a lifetime making these adorable crafts.
10. Finger-paint Tree
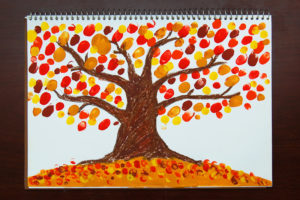
What you need: Drawing or print out of a tree and paint.
For this craft, all you have to do is print out or draw a picture of a tree. You could do this part before everyone gets to your house but if there are a lot of artists in the family they can draw their own. Put out some washable paint and have each child make leaves with their thumbprint. This is a very simple craft and it looks nice framed or hung up on the fridge.
Get the tutorial at First Palette
9. Paper plate Turkey
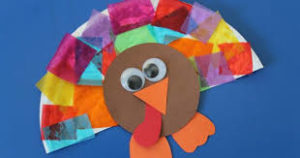
What you need: paper plate, tissue paper, brown construction paper, orange construction paper, glue and googly eyes.
The first thing that you will have to do is cut a paper plate in half. Cut up bits of tissue paper in little squares. You can use whatever colors you have on hand. The more colorful the better. The kids will have fun gluing the little squares all over the paper plate. Glue a circle on the front of the plate for the head. Cut out a gobbler and beak. Glue on googly eyes for the finishing touch.
Get the tutorial at Happy Home Fairy
8. Nutter Butter Turkey Cupcakes
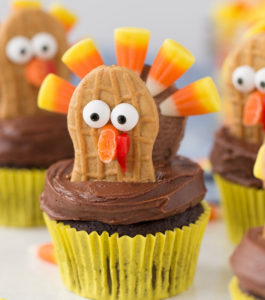
What you need: Cake mix (any), icing, candy corn, nutter butter cookies, Oreos, red candy preferably a fruit roll-up, edible eyes and cupcake wrapper.
This is a craft that you can eat. What is better than that? You can make any flavor of cupcakes that you like. This is a fun thing for all of the kids to help with. While they are cooling start making turkeys on the nutter butter cookies. You can use the orange part of candy corn to make the beak. Use little pieces of fruit roll-up or some other ready candy for the gobbler. You can paint on eyes with icing or use edible eyes from a craft store. Stick candy corn inside of an Oreo for the body of the turkey. Assemble the body on top of the iced cupcake and voilà you have a perfect Thanksgiving dessert.
Get the tutorial at Your Cup of Cake
7. Leafy Placemats
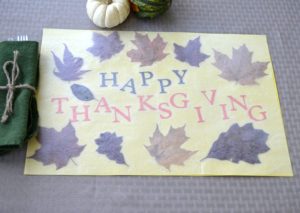
What you need: assorted fall leaves, wax paper, an iron and card stock in fall colors.
The first thing you need to do is have all of the kids go out in the yard and pick up some of the leaves that they like. Lay a piece of wax paper down first and then the construction paper. Have the kids arrange the leaves around on the paper in a way that they like. Have them write Happy Thanksgiving and then lay the second piece of wax paper on top of all the project. Take the iron and run it on top of the way paper and it should bond together created the finished placemat.
Get the tutorial at Momtastic
6. Pinecone Turkey
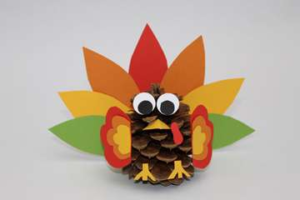
What you need: Pinecone, googly eyes, red, yellow, orange and green paper, glue.
You can find pinecones in craft shops, but it could also be fun to go out and find some around where you live. The next thing you need to do is cut out feathers with the construction paper. Then all you have to do is glue the feathers on. Hot glue works best but you can use what you have at home. Cut out wings, a beak, and a gobbler and you are almost done. All that’s left is to glue googly eyes on and you have a cute little turkey.
Get the tutorial at Scholastic
5. Scarecrow Paper Plate Craft
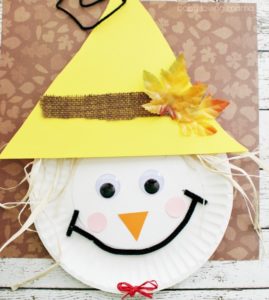
What you need: Plate, googly eyes, pipe cleaner, construction paper, tan raffia, and glue.
This is a unique craft that is cute for the fall season in general. You will take a paper plate and turn it into a scarecrow that each child will be able to take home and hang up at their own house in the fall next year. You will have the children cut out a hat that will help make the raffia look more like hair. They can decorate the hat anyway they want. Glue some raffia on the top of the plate and then glue the hat. Place the eyes, nose, and mouth and that’s it.
Get the tutorial at Finding Zest
4. Native American Teepee Templates
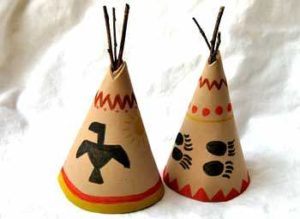
What you will need: The teepee template, crayons, and sticks.
This is the perfect way to teach the children in your family about native American culture. These teepees will look great as a decoration on the table. The first thing you need to do is print out the templet. You can have each child color their teepee however they want. Once they are finished with that cut it out and make it into a 3D shape. Add sticks to the top to give it a more accurate look. This craft is very simple and quick to make and they look great.
Get the tutorial at First Palette
3. Bubble Wrap Indian Corn
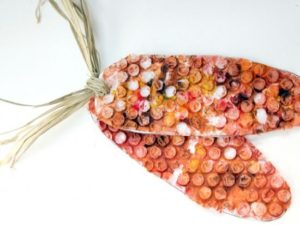
What you need: Bubble wrap, paint, twine, and card stock.
The first thing that you will need to do is draw a piece of corn on a white piece of card stock. Cut out a piece of bubble wrap the same shape and size of the corn. Then you can have all the kids paint their piece of bubble wrap with yellow, red and orange until it is completely covered. Let that completely dry and then glue it to the card stock cut out. Punch a hole in the top and tie a piece of twine to make it look like the corn husk.
Get the tutorial at Kiwi Co
2. Paper Strip Pumpkin
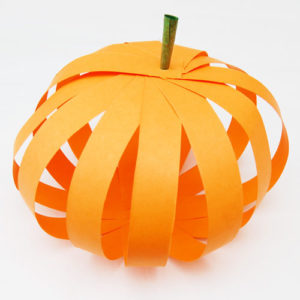
What you will need: Orange construction paper, green construction paper, glue and a marker.
This is a very simple craft that will make a nice centerpiece on your Thanksgiving table. Cut out a bunch of orange stripes of paper. If you want this to be kind of small cut the stipes when the paper is horizontal. If you want it to be a little bigger do this when the paper is vertical. Form the stripes in the shape of a circle and start to glue them together. Twist a strip of green paper and put it at the top of the sphere so it looks like the stem. You can leave it there or have the kids write things they are thankful for on the orange strips before they make the pumpkin shape to make them more meaningful.
Get the tutorial at A Dab of Glue will do
1. Pilgrim Hat DIY Cookie Craft
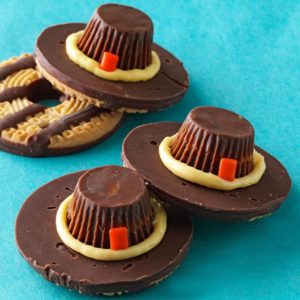
What you need: Vanilla frosting, yellow food coloring, miniature peanut butter cups, fudge stripe cookies, and orange bubblegum.
The first thing you need to do is put the vanilla icing in a bowl. Add some of the yellow food coloring and mix it up. This will be used as the glue that holds the peanut butter cup to the fudge stripe cookie. Flip the fudge stripe cookie so that the chocolate side is facing up. Then put some of the vanilla icing on the center of the cookie and place the peanut butter cup on top. Then place the orange gum in the front for added detail. This is a very simple craft that the kids will love making together.
Get the tutorial at Taste of Home